This tutorial covers a technique for animating paint strokes applied to a still image so that it appears to be a work of impressionistic art. Adobe After Effects is the software application used in this demonstration, but you can take the method outlined here and apply it to your own compositing application. Parts of the tutorial, however, will only work in Adobe After Effects and Autodesk Combustion. To achieve the desired effects as shown in the video above, the following plugins from RE:Vision Effects should be installed into your compositing application.
Click the plugin names to download them from the RE:Vision Effects website:
You should have an intermediate understanding of Adobe After Effects in order to follow the steps outlined in this tutorial. Following along requires the use of the files found in the project archive that you can download from the link below. Unzip the archive file and open the Adobe After Effects CS3 project file to begin. Once open, within the project panel, you will find finalized versions of the compositions that you will eventually build by performing the steps in the tutorial.
The first part of the tutorial covers the technique in its most basic form. The sections in the first part show
how to define a direction map for the paint strokes to follow, how to create a map for the stroke velocities, and
the effects design. The second part of the tutorial shows two methods for controlling the paint strokes in a more accurate and precise manner.
Feel free to download a print version of this tutorial in Adobe PDF format as well.
PART 1 | Basic SetupThis part will guide you through the method for preparing all the compositions that will be processed by the Video Gogh plugin. At the end of this part, you should have four compositions, with the final one showing the effect as applied to the image of the apples.
Section 1.1 | Direct The StrokesThe objective in this section is to create a composition that will act as a map for the direction of strokes at each pixel. Defining specific areas of the image with spline masks allows you to control where the strokes will move and in what direction they will move. This is done by utilizing SmoothKit (SK) Directional With Splines operator.
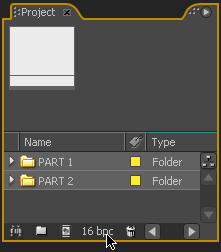
Set the project color space to 16
bits-per-channel (bpc). You can do this by holding
down the ALT key, and then click the color space readout at the bottom of the project panel.
Each time you click the readout while holding
the ALT key, the color space will change
from 8bpc to 16bpc to 32bpc.
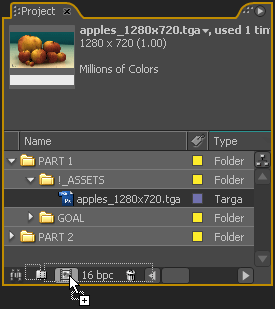
Create a new composition by dragging apples_1280x720.tga
to the new composition button in the Project panel. Rename the generated composition to COLOR SOURCE. Ensure the duration of the
COLOR SOURCE composition
is
at least 00:05:00 seconds long.
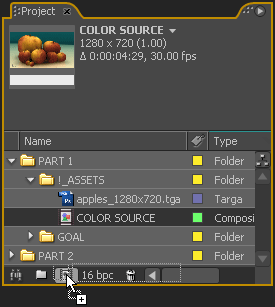
Drag the COLOR SOURCE composition asset in the project window to the new composition button at the bottom of the Project panel. Rename this composition to STROKE DIRECTION MAP.
1.1.4In the STROKE DIRECTION MAP, ensure the COLOR SOURCE layer is selected. On this layer, draw closed masks around each apple's highlights. As well, create masks around the perimeter of the two largest apples as shown. Each time you add a new mask, set that mask's operation to None from the dropdown menu next to the Mask name.
Add the SK Directional With Splines operator to the COLOR SOURCE layer. Set
View Mode to Len Mod + Dir Map. You should see the image of the apples change from the image to a gradation of colors from a blue to pink hues. Set Length to 1.00. Finally,
set Len Mod Mode to Scale Len - Spline Settting. Leave all other settings as default. The image shows the correct parameter settings for the SK Directional With Splines operator.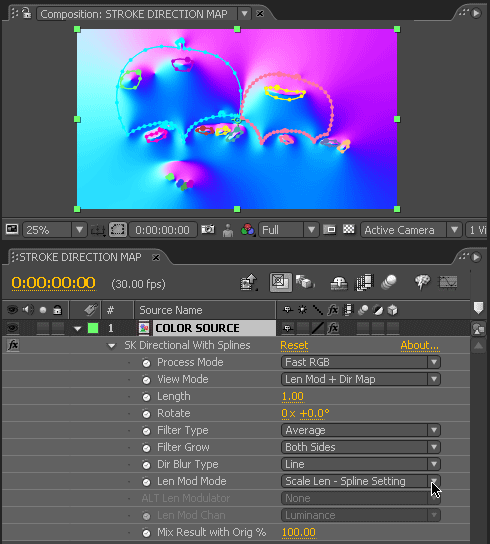
The next steps show how to create a composition that will behave as a motion vector map used in the final effect. Essentially, you will convert the STROKE DIRECTION MAP composition into a new composition that acts as a motion map which is fed into the Video Gogh Pro operator used in the final composition.
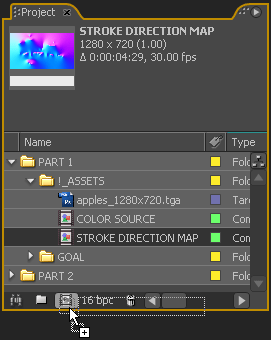
Drag the STROKE DIRECTION MAP composition asset in the Project window to the new composition button in the Project panel.
Rename the
new composition to
STROKE VELOCITY MAP.
In the STROKE VELOCITY MAP composition, apply the RE:Map Displace operator to
theSTROKE DIRECTION MAPlayer. Set Process Mode to Show Vectors. Set
Warp Amount to 1.00. Set Displacement Source to STROKE DIRECTION MAP and Modulation Source to STROKE DIRECTION MAP. Open the Modulation Controls set of parameters and set Modulation Channel to Blue. When you finish this step, you should see a similar image as found in the STROKE DIRECTION MAP composition, but the
colors blend from green to red instead of blue to pink.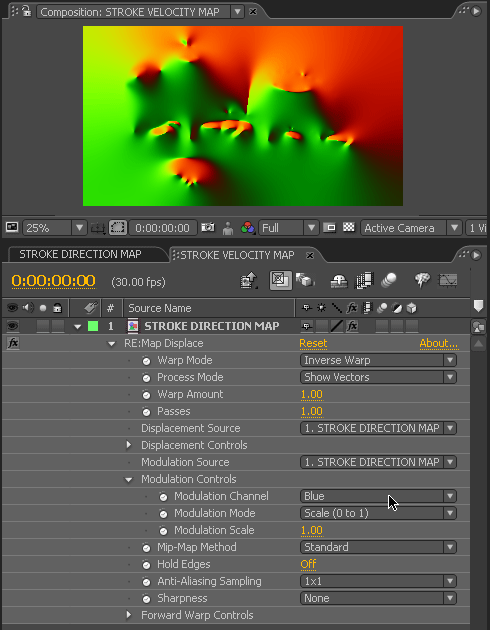
The next steps show the composition setup for the final rendered effect, and for setting the parameters for the Video Gogh Pro operator. The steps require the use of the STROKE DIRECTION MAP and the STROKE VELOCITY MAP compositions created in the previous sections. When you finish this section, you should have a composition that looks similar to the video on the right.
1.3.1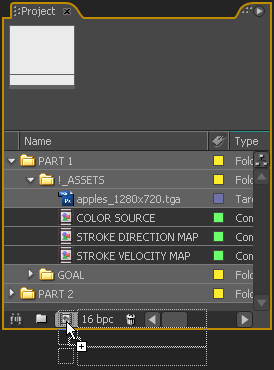 In the project window, select the COLOR SOURCE,
STROKE DIRECTION MAP,
and
the STROKE VELOCITY MAP compositions. Drag all three assets to the new composition button at
the bottom of the Project panel. The
New Composition from Selection dialog box will appear. Ensure that Single Composition is selected in
the Create area of the dialog box.
Also, all checkboxes should
remain empty. Click OK to
continue.
Rename the new
composition
to PAINTING.
In the PAINTING composition, ensure the top layer is the COLOR SOURCE
composition asset.
Apply the
Video Gogh Pro operator to the COLOR SOURCE layer.
Set the Max Brush Size to 0.08. Set Alt Direction Src to STROKE DIRECTION MAP, and Direction Method to Use as Direction Map. Set Alt Motion Src to STROKE VELOCITY MAP.
Set Alt Motion Mode to Vectors, Next. You should now see the Vectors: Max Displace parameter become active.
Set this
paramerter to a value of 4.00.
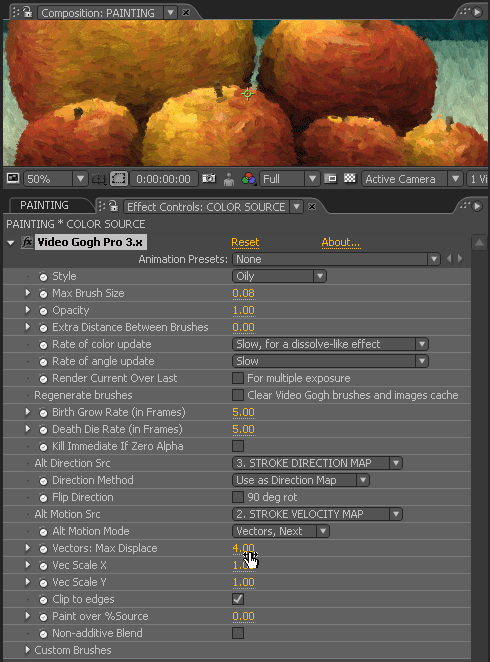
Preview the animation. Because of the computationally intensive work performed by the Video Gogh Pro operator, it is generally a good idea to lower the preview Resolution to Quarter, and set the Zoom Level of the composition viewport to 25%. By this point, you should see the strokes animate around and within the spline masks that you created on the COLOR SOURCE layer in the STROKE DIRECTION MAP composition. The spline shapes behave like a vortex for the strokes. The next part of the tutorial shows a few methods for controlling the paint strokes in a more precise manner.
The following sections show two methods for controlling the speed of the paint strokes in the PAINTING composition. The first calls for adjusting the masks that were created in the STROKE DIRECTION MAP composition. The second uses a matte image to designate which strokes should remain static.
SECTION 2.1 | Speed Via OpacityBy altering the opacity of an individual mask in the
STROKE DIRECTION MAP, you can effectively control the speed
of the strokes in the PAINTING composition. After completing the steps below, your final composition video should look similar to
what is seen on the right.
Open the STROKE DIRECTION MAP composition timeline, and in its composition viewport, select the mask around the largest apple that is attached to the
COLOR SOURCE layer. Set its Mask Opacity parameter to 0%. After doing this, you should see the pink and blue hues change to red and green hues. Notice this same area of pixels in the STROKE VELOCITY MAP composition is now a flat mustard-yellow color. This color
in the velocity map means that paint strokes in that area will move
slower than
in other parts of the image.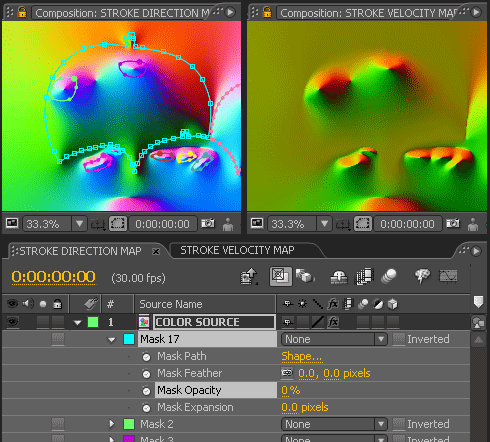
Preview the PAINTING composition. Notice the area of pixels around the mask that changed color in the previous step. Setting the Mask Opacity to 0% brings the
paint strokes within and around that mask to a complete halt. The masks that are contained within the larger perimeter mask of the apple maintained a Mask Opacity
values of 100%. This is why the strokes still move near those masks.
For a complete description of motion vector maps used in this tutorial, see
the motion vector FAQ on the RE:Vision Effects website.
Now vary the Mask Opacity parameters values for each of the masks in the
STROKE DIRECTION MAP composition. In the PAINTING composition, the paint strokes move slower inside masks with low opacity values when compared to the paint strokes inside masks with higher opacity values.
In essence,
you can use the opacity value of a mask in the STROKE DIRECTION MAP composition
to control the paint stroke
speed
in
the
final rendered image.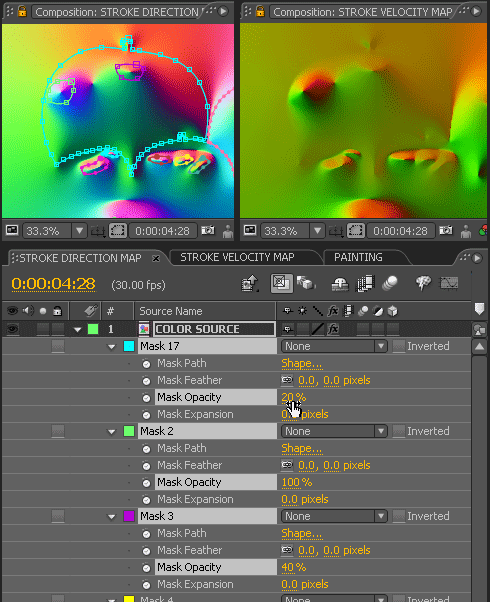
The following steps show how to use a matte image to designate which areas of the image should have moving strokes and which should have static strokes. By operating directly on the STROKE DIRECTION MAP composition, it is possible to accurately control the stroke's speed in different areas of the image.
Drag the apples_1280x720_matte.tgaasset from the project window to the
STROKE DIRECTION MAP composition timeline. Ensure this asset is placed in
a layer above the COLOR SOURCE layer.
Set the Track Matte (TrkMat) property of the COLOR SOURCE layer to
Luma Matte "apples_1280x720_matte.tga".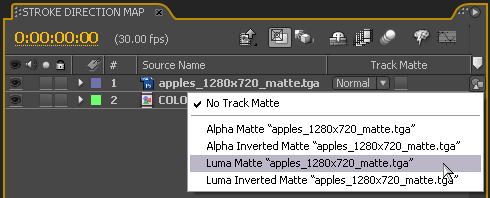
Create a new Deep Yellow Solid (0.5 | 0.5 | 0) solid layer and arrange it below all the other layers within
the STROKE DIRECTION MAP composition. The RGB values of this solid will have an influence on the orientation of the strokes within the dark areas of the matte image.
Open and view the STROKE VELOCITY MAP composition. Notice the areas of red pixels in the STROKE DIRECTION MAP composition appear as a flat mustard-yellow
in the STROKE VELOCITY MAP composition. This color means that paint strokes in that area will remain static, and will be horizontal in the PAINTING composition.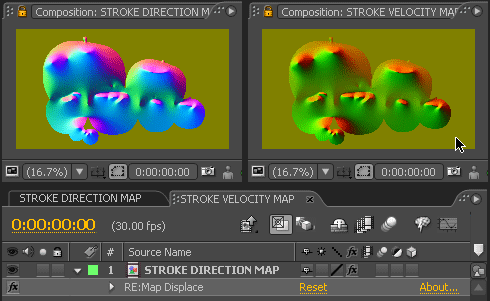
Preview the PAINTING composition, and you should see the desired effect where the paint strokes within the apples are moving while the horizontal strokes outside the apple are static. Now, experiment with animating those splines or matte images!
For a different perspective on how footage, compositions, and operators work together to create this effect, take a look at the composite tree for the PAINTING composition. This illustrates the structure of the effect and can be of help when troubleshooting.
Author Tutorial by Arie L. Stavchansky. Visit his site.