How do I get motion vectors out of my 3D system?
You can extract motion vectors which are compatible with ReelSmart Motion Blur from some host applications by using third-party plugins.
Our tools cannot use the motion vector images unless they represent pixel motion in screen space, so you must extract the vectors from a space in which you still have access to the whole 3D scene.
For RE:Vision Effects products, 0.5 of Motion Blur is 180 shutter open if the Motion Vectors represent a full frame interval. We suggest the following simple test, prepared by Dan Rosen of Evil Pictures, to see if you are using a 3D renderer which is compatible with ReelSmart 3D Motion Blur.
 You should read all related documentation from RE:Vision Effects, the plugin producer, and the host application before beginning production
We publish methods that are currently available and that don’t entail you writing your own motion vector shader. If you have information on other methods, please let us know so that we can update this FAQ (you can email us at: techsupport (at) revisionfx (dot) com).
How we interpret images representing motion vector images.
How we use the alpha channel of motion vector images.
3d Max 8 And Up
Cinema 4d
Lightwave
Maya
You should read all related documentation from RE:Vision Effects, the plugin producer, and the host application before beginning production
We publish methods that are currently available and that don’t entail you writing your own motion vector shader. If you have information on other methods, please let us know so that we can update this FAQ (you can email us at: techsupport (at) revisionfx (dot) com).
How we interpret images representing motion vector images.
How we use the alpha channel of motion vector images.
3d Max 8 And Up
Note: this FAQ was produced with the help of Yoni Cohen, Oliver Zeller and Keith Chamberlain.
This technique writes out image files that are to be used as motion vectors for use with RE:Vision Effects plugins. The x-displacement is encoded in the red channel of the image and the green channel encodes the y displacement. Alpha information is also important. You can read more about our vector image format here.
Max 8 now has a new render element which eliminates the need for the La Maison shader (which does not work in Max 8) or Sven Fabian’s Max Script.
 BONUS: Keith Chamberlain from Discreet provides the following tip. If you have portions of your animation coming on and/or off screen you will probably want to render a larger image than ultimately needed, then process with our plugin, then crop using your favorite compositing package. You can find the overscan script here, and scroll until you find the overscan script.
- Open the Render dialog by selectin Render… from Max’s Rendering menu.
(click to enlarge)
- Go to the Render Elements tab in the Render dialog box and add a Velocity Render Element by clicking Add… in the Render Elements section of the Render dialog box. Then another dialog box comes up and you should choose to add a Velocity Render Element.
(click to enlarge)
- Scroll down to the bottom of the Render Element settings and you will see the settings available for the Velocity Render Element. You’ll see a setting for Max Velocity; this setting corresponds to the Max Displace value seen in RE:Vision Effects’ products= The default Max Velocity is set to 1.0, which means the maximum that can be encoded in the output file is 1.0 pixel in either the X or Y direction which is not very useful . You should change this to a value that encompasses the maximum motion, in pixels, for any object in the scene. If you don’t know what this may be, a good value to start with is 2048.0. You also need to specify what the output file sequence is for the velocity-encoded images. Make sure to use a 16 bit or floating point image format that does no compression or lossless compression (for example: 16 bit TIFF files or PNG files).IMPORTANT NOTE: 3ds Max renders out velocity images assuming that the y index for pixels of an image increases as you go down the image, and our plugins assume that the y index of images increasses as you go UP the image. As such you will want to use a Vec Scale Y of -1 when using our plugins when rendering out velocity images from Max 8.
(click to enlarge)
- In a perfect world, we would be done now. However, some materials (like texture shaders) are incompatible with the Velocity Render Element that Max 8 provides. As such, the next few steps describe a workaround you will need to use. In the Common tab of the Render dialog, set the Production and Materia Editor renderers to the Mental Ray Renderer.
(click to enlarge)
- As was said previously, some material shaders for writing vector image files are not compatible with Max’s Velocity Render Element. To make sure that you have a material that will work properly with this process, create a new material in the material editor and simply assign the Standard shader to it (we use the Standard material because this one is known to work with the Velocity Render Element). Leave all the settings at their defaults and do not assign any maps to any of the settings.
In the figure above we have created a new material in the material editor (the one circled in red) and have assigned the Standard material shader.
(click to enlarge)
- At this point you are probably wondering how much work it will take to replace all your materials with this material. Luckily, it’s easy. With the Mental Ray renderer, Max 8 allows you to override all the materials by enabling and setting the Override Material in the Processing tab of the Render dialog. So you don’t need to replace the materials on each object. Note that you can drag the material from the material editor onto the place that specifies the override material to be used.
(click to enlarge)
(click to enlarge)
See how to export motion vectors from Cinema 4D in our tutorials:
Early on, we did some tests with Kenneth Woodruff and it appeared that the PhotoShop layer output of Lightwave can be used to render motion vectors in 16bpc. More tests might be needed. We noticed that it is very important to turn OFF the antialiasing setting for the Motion Vector output render pass, otherwise the Motion Vectors are incorrectly composited when two objects intersect which will cause bad artifacts at the edges of objects. Many applications seem to have problems reading PSD layers image sequences. So instead why not just generate standard image sequences:
Richard Nichols has made available a Lightwave plugin. Go here for more information.
Sven from HouseOfSecrets has been working on this plugin http://www.houseofsecrets.nl/downloads/plugins.htm
See how to export motion vectors from Maya in our tutorials:
Maya 2018 and up
Maya now ships with Arnold. Instructions are here: https://help.revisionfx.com/task/21/Maya 2009 or later
Jake Dean has created a tutorial demonstrating an alternative method using the new 2D motion vector pass found in Maya 2009 and up. The tutorial can be found here. Download sample Maya 2009 scene files that are properly setup to export motion vectors in our format (and the expected render passes are also included).All versions of Maya
Turtle For Maya Turtle for Maya from Illuminate Labs now has support to render Motion Vectors which conforms to our Motion Vectors documentation. Tests and Documentation in preparation. AIR for Maya (via MayaMan) AIR from SiTex Graphics has a motion vector pass option. We have not tested it ourselves, but clients report that their motion vector pass works with our plugins that use motion vectors as input. V-Ray Here is a very short step by step note for Motion Vectors out of Vray, and thanks to Vladimir Koylazov of ChaosGroup for providing help. First: click here to download the examples zip file.Additional Notes: This workflow will work fine for motion blur uses, however note the vectors output are “instant” velocity. For other uses like Twixtor or VideoGogh where you need motion to previous or next frame instead, you will need to use the Mental Ray shader. La Maison mental ray plugin in Maya This FAQ was produced with the help of Dan Rosen and Horvatth Szabolcs; the information Horvatth Szabolcs originally posted can be found here. First: download the Maya files from Horvatth Szabolcs’ site here. Of particular interest in the .zip package is the .mi file and the .mel template. For the shaders themselves (the .so files) follow the instructions listed here:
- Open the attached maya scene and one frame render: rsmb.zip attached go to frame 5 and render.
- Open the Render Settings, go to the Render elements tab and click on the Velocity element to show its properties.
- Note the “Max. velocity in last frame” value – it should be something like 117.89. However, we will set the “Max. Velocity” value just above a little higher – to 130. This is the value to then type in RSMB Vectors for Max Displacement. You can just set it to the image width if you like so you don’t have to worry about this, there is enough resolution in a 16bit image until about 2K before you need to be worried about Max Displacement/Velocity.
- Note that the output image format is set to PNG with 16 bits per pixel in this example. You will have slightly more motion definition if you use formats like PNG and TIFF instead of Open EXR for example.
- Render the image
- You should get two files – rsmb_tmp.png and rsmb_tmp.velocity.png. We provide here link to frame 5 output as reference as well as Nuke, AE and Fusion projects for it.
- No Color Management please: For example,
- In Nuke, create Read nodes for the two images; for the rsmb_tmp.velocity.png image, make sure you set the “colorspace” to “linear” and not the default “sRGB” (or check raw data). If you don’t do that, you will get wrong result.
- In After Effects, same turn off Color Management Advanced Tab in Interpret footage for the velocity element (Preserve RGB checkbox will do) if you work in color managed space. Note if you use a different file format for motion vectors there is a way in AE to set preferences for that so it’s automatically done. Also make sure you work in 16bit project (or 32b float one).
- Create the RSMB Vectors node/apply effect; attach the velocity image as the “Motion vectors” input and the RGBA image as the “Source” image.
- Set the “Max Displacement” value of the RSMB Vectors node to the same value we had in the “Max. Velocity” attribute for the Velocity render element in Maya – in this case 130.
- That’s it. Render the result to produce the motion blur. As you can see the RSMB result (rsmb_nuke.png) matches the 3d motion blur result (rsmb_mb.png) quite closely.
Recommended Settings for using the La Maison Mental Ray shader within Maya These settings have only been tested with the La Maison vector shader and not the unsupported mip_motion_vector shader by Mental Images. In Maya you can save all this as a reusable Render Setting so don’t feel overwhelmed by the level of things that can be changed.
- Windows (32 and 64 bit): Download the mental ray vector shader, provided by La Maison. The docs on the La Maison mental ray shader page talk about Softimage|XSI, but simply download the shader and follow the directions below in the Recommended Settings for Maya” section below.
- Linux 32 bit: Download the mental ray vector shader, provided by La Maison. The docs on the La Maison mental ray shader page talk about Softimage|XSI, but simply download the shader and follow the directions below in the “Recommended Settings for Maya” section below.
- Linux 64 bit: Download the compiled mental ray shader .so file from Haarm-Pieter Duiker’s site here. From the author: Fedora Core 7 was used to compile the Linux 64-bit shader. This may cause some problem for people running mental ray on other platforms. The makefile is there next to the source if it there is a problem.Note: this download only includes the .so files for various OS’s, so you still need to download the .mi and .mel files from this site.
- Mac OS 32 bit: Download the shader, .mi and .mel files needed, plus instructions for installation from Evil Eye Pictures free download here.
- Andrew Hazelden has compiled it for Mac OS 64b Maya 2011 and 2012, download page.
- Other OSs, or problems with shaders provided. Download source and makefiles from Haarm-Pieter Duiker’s site here. The makefiles provided should allow you to modify them for your particular situation.
Settings for Maya when outputting motion vector pass: Shutter Angle: It is recommended you use a shutter angle value of 180 degree in Maya. The shutter value in Maya (unlike the other controls mentioned here) is in the Camera settings (under effects). Note that the default is 144. Shutter Open and Shutter Close (in Maya pre-8.5 these two settings were called “shutter” and “shutter delay”): Set both “Render Settings > mental ray > Motion Blur > Rendering > Shutter Open” and “… Shutter Close” to .5 not 1.0. This is super important and MUST be done on any and all render passes; beauty, motion-vector, etc. Bit-depth of output vectors:Set “Primary Framebuffer > Data Type” to “RGBA [Short] 4×16 Bit (to get 16-bit vectors and not 8-bit) Note: It is important to understand that Maya scales motion vectors based on the Shutter Angle value. It defaults to 144 in Maya. The net effect is a tool like RSMB Blur Amount for example is internally scaled to a full Motion Vector Length meaning 360 degree so Amount of 0.5 means 180 degree. As people have reported some issues with setting shutter to 360 degrees in Maya, then you can consider setting the shutter angle to 180 but then you have to compensate somewhere by a factor of 2, either the relationship of the shader Normalize param and our plugins MaxDisplace value OR in the case of RSMB by setting the amount to 1.0 instead of 0.5 as below. Furthermore in the Mental Ray Render Settings, the “Motion Blur Calculation” parameter scales that as well.
Quick Install Recap: (trust Horvatth’s page quoted above more than us for this info!).
Important Notes You should refer to this FAQ for Mental Ray Shader settings How La Maison’s Mental Ray plugin works with RE:Vision Effects plugins Much like Guy explains for the use of the shader within XSI on the La Maison site, make sure that the Maya is rendering with motion blur on, but with the shutter effectively zeroed. For such, we recommend to set “Shutter Open” and “Shutter Close” values to be both 0.5 OR the smallest value you dare to type e.g. 0.000001. Both of these values will ensure that you do not motion blur the motion vectors themselves if they are set to the same value. There seems to be an issue matching MB off and MB “exact deformation” with Shutter Open and Close of 0.5 and 0.5 in Maya. Thus one cannot apparently simply take the alpha of the beauty pass and make it in post the alpha of the MV pass without creating artifacts. It’s been recommanded to us to set your whole pipeline to always work at 0.5 “Shutter Close” in Maya so a beauty pass without MB, an MV pass and a 3D MB passes all matches as best can be. Some rudimentary tests seem to indicate no real effect on rendering speed (MB off vs MB with Shutter Open and Shutter Close of 0.5 and 0.5). Alternatively if you don’t mix and match 2D and 3D motion blur, you can work at a real tiny value like 0.000001 for the MV pass and MB off (you would be at worst in a 1000 image res pass, 1000/1000000 (or 1/1000) pixel off). Maya UI won’t show values below 0.001 but will pass them correctly to the renderer. Furthermore if one forgets and leave at 0.000 by copying without seeing, then they will get flat zero motion so it will be obvious. To get an alpha from the shader, one has to check in Custom Entities in the Render Settings the “Pass Current Alpha Channel” option. Do not try to use the beauty pass alpha in Maya. It won’t perfectly align. The samples values (Anti-Aliasing in Render Settings) will have an effect on your result, the minimal setting (which is minimal anti-aliasing) would be (min0/max0, filter : triangle 1/1). You might prefer a bit of anti-aliasing, particularly for warping tasks (as opposed to blurring ones) as on some odd shapes you could otherwise create small artifacts. It is not possible in Maya to set shutter to 0.0 0.0 as Maya in that case does not set “-motion on” thus motion vectors are not passed to the shader. If working on a MAC, you must first apply a surface shader to the object you want to render with the lm2dmv shader then in the surface shader color channel link it to the lm2dmv node and it will work both in the render view and in batch… otherwise on the mac batch loses connection to the shader somehow. On Windows, both will work if you just drop the node on the object. Optimization When rendering the Motion Vectors pass a number of things can be turned off to speed up that pass. For example, lights can be hidden as they have no impact. We were told that turning off raytracing and setting time contrast to 1 1 1 1 could speed up that pass render as well, but have not extensively tested and presume that perhaps it would come into play only if shutter and shutter delay are not set to same value. We have not been able to find any use for the Custom Motion Offsets in the Mental Ray Render Settings of Maya.
- Download the Maya files from Horvatth’s page Maya Files (zip file also includes an icon for HyperShade) and Copy the lm_2DMV.mi file to the `mayaX.0/mentalray/include` directory.
- As well, copy the AElm_2DMVTemplate.mel file to a maya script directory
- Copy the DLL (or .so) to the `mayaX.0/mentalray/lib` directory.
- Add the following lines after similar declarations in the maya.rayrc file. The rayrc file is in the MayaX.0/mentalray directory in Maya X.0.
Do not rename an installed Maya (eg maya7dot1) as you risk breaking links to shaders
- for Windows:link “{MAYABASE}/lib/lm_2DMV.dll” mi “{MAYABASE}/include/lm_2DMV.mi”
- for Linux and Mac:link “{MAYABASE}/lib/lm_2DMV.so” mi “{MAYABASE}/include/lm_2DMV.mi”
- for Mac only: if you are not familiar with such installation, you access this by right click to show package content.
- The lines added to maya.rayrc initializes the shader for Mental Ray. If they do not exist then the shader will only in Maya, but not in Mental Ray, and the following error messages will appear in the output window:API 0.0 error 301031: call to undeclared function “lm_2DMV”API 0.0 error 301036: undefined shader “lm_2DMV1”
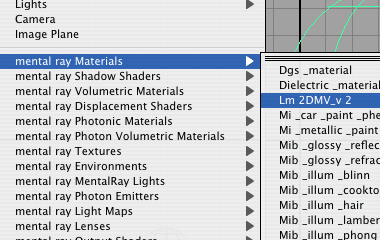
- The shader will appear in MentalRay Materials.
- lm_2DMV appears in the HyperShade at the `Create mental ray Nodes/Materials` tab. (If you don’t have this tab then create an environmental variable called MAYA_MRFM_SHOW_CUSTOM_SHADERS set it to 1 and restart Maya. It will enable the display of Mental Ray nodes.)