Skip to content

How to set up host applications for RE:Vision plugins that make sequences longer?

Products with plug-ins like FieldsKit and Twixtor can generate more frames than your source sequence length. But many host applications do not naturally allow effects plugins to add more frames. Because of this, there are workarounds that need to be performed in order for RE:Vision Effects time-extending plugins to work properly. Each application has its own idiosyncrasies.
After Effects
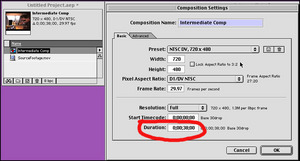
The plugin by itself cannot extend the duration of the source it is applied to… so you’ll need to help After Effects. If you are making the duration of a piece of footage longer, we think that the most convenient way to do it is to put your footage in a composition that is of the desired final duration (the “pre-comp”) and then apply the plugin to the pre-comp inside of another composition. In the example below, “SourceFootage.mov” is 19 seconds, and the final duration is to be 38 seconds. Note that “SourceFootage.mov” could be another composition that the plugin is to be applied to. METHOD 1 So we first place SourceFootage.mov in a “pre-comp” named Intermediate Comp, which has the correct final duration of 38 seconds.

After Effects Figure 1. Create an intermediate or “pre-comp” of the final duration, which in this case is 38 seconds.

(click to enlarge)
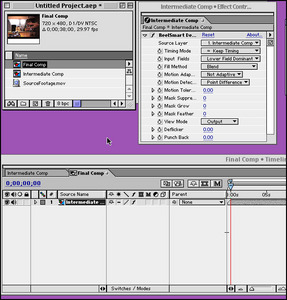
After Effects Figure 2. Apply plugin(such as FieldsKit Deinterlacer) to the Intermediate Composition inside the Final Comp.

(click to enlarge)

METHOD 2

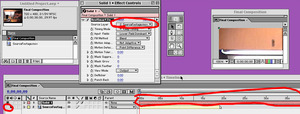
There is another workaround to making a clip longer with a plugin which we mention here because it saves you from “pre-comping” your footage: Drop your source to be processed (we’ll call it SourceFootage.mov) into a composition (of course the source may be another composition). Then create a Solid of the same pixel dimensions as SourceFootage.mov. and make the Solid layer have the duration that you need of the resultant processed source. Apply the plugin to the Solid layer and set the Source Layer to be SourceFootage (by default, Source Layer will be set to the new Solid layer you just created). In addition, you’ll probably want to make the SourceFootage layer invisible (by clicking the eye icon in the composition window), so if you have transparency in your footage, the non-processed footage doesn’t show through. You can also do the same thing using an “Adjustment Layer”. Both Solid and Adjustment layers inherit the composition duration.
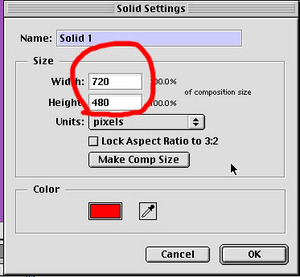
After Effects Figure 3. Make a Solid Layer. Make sure the pixel dimensions are of the same dimensions as the source footage.

(click to enlarge)

After Effects Figure 4. Apply Plugin to the Solid Layer, making sure the Source Layer is set to SourceFootage.

(click to enlarge)

Note that:
  1. Plugin is applied to Solid Layer, which has been set to the correct final duration.
  2. Plugin source layer is set to SourceFootage.
  3. We also suggest you turn off the visibility of the SourceFootage layer, because seeing it can be visually confusing.
OTHER METHODS There are other workarounds as well. Yet another workaround to making source footage longer is to first extend its duration by looping it, using After Effects “Interpret Footage.” You can then apply the plugin directly to this extended piece of footage inside of a composition. This will only work with Imported Footage, and not with nested comps.
Final Cut Pro 6 and 7
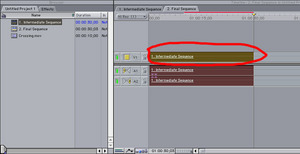
The plugin shows up in the submenu “Effects->Video-> Filters->REVision plugins.” IMPORTANT: A plugin by itself cannot extend the duration of a layer or sequence it is applied to. If you are making the duration of a piece of footage longer you will first need to put your footage in a sequence that is the correct final duration. Make sure this intermediate sequence is extended to the correct final duration with valid frames (To “trick” the plugin into producing a frame for ALL of the extended sequence). This is a necessary FCP workaround. Each frame must be unique, or FCP will not rerun the plugin on each frame. As such you cannot use the Slug or Gradient video generator. We now suggest that you extend the clip by simply appending multiple copies of the original clip along the timeline in the intermediate sequence. This will create a new and different frame at each point in time. Now apply the plugin to this intermediate extended sequence inside of another sequence. Having different input and output frame rates using the plugin is not supported by Final Cut Pro. For example, lets say we want to apply a RE:Vision Effects time-extending plugin to a 10 second sequence, and that the final sequence will be 30 seconds.
FCP Figure 1. First we make an Intermediate clip and extend the source clip by adding 20 seconds of the original footage. Because the original clip is 10 seconds, we need to add two more copies of the clip.

(click to enlarge)

FCP Figure 2. The plugin should then be applied to the Intermediate sequence inside of another sequence.

(click to enlarge)

Final Cut Pro X
IMPORTANT: A plugin by itself cannot extend the duration of a layer or sequence it is applied to. If you are using a plugin, such as Twixtor or FieldsKit, read this document that describes the process of what you need to do in FCP X.
Premiere Pro
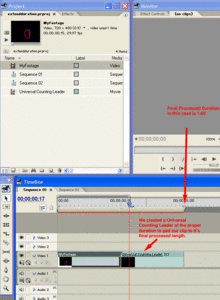
Users of Premiere 6.0 or 6.5 please see the following subsection IMPORTANT: A plugin by itself cannot extend the duration of a layer or sequence it is applied to. If you are making the duration of a piece of footage longer you will first need to put your footage in a sequence that is the correct final duration. Make sure this intermediate sequence is extended to the correct final duration with valid frames (To “trick” the plugin into producing a frame for ALL of the extended sequence). This is a necessary Premiere Pro workaround. Each frame must be unique, or Premiere Pro will not rerun the plugin on each frame. As such you cannot use the Black Video video generator. We suggest you use the built in Universal Counting Lead (see the Premiere Pro manual) , which will create a new and different frame at each point in time (although you can use any piece of footage that changes every frame to pad out the sequence) Now apply the plugin to this intermediate extended sequence inside of another sequence. Having different input and output frame rates using the plugin is not supported by Premiere Pro. The plugin by itself may not extend a clip past its original duration. So let’s say we want to make sequence longer by a factor of 2. First we put our clip into a sequence (we’ve named it Sequence01). We then create a Universal Counting Lead clip (see the Premiere Pro manual) of the required duration to pad the clip to the final duration that we need.  

(click to enlarge)

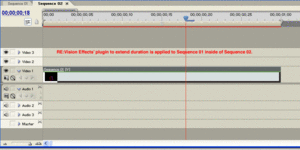
We then include Sequence01 into another sequence, Sequence02 and apply our plugin to Sequence01.  

(click to enlarge)

Premiere 6.0 or 6.5 For any Premiere projects using the plugin : If you are using the QuickTime editing mode:
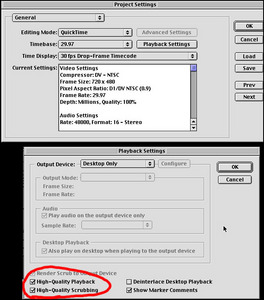
  • It is suggested that “Project Settings > General > Playback Settings > High-Quality Playback” should be checked.
  • It is suggested that “Project Settings > General > Playback Settings > High-Quality Scrubbing” should be checked.
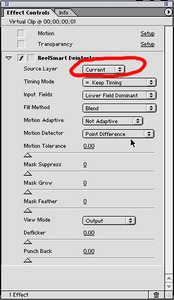
  • It is suggested that the Plugin Source Layer be set to Current (which is the default).
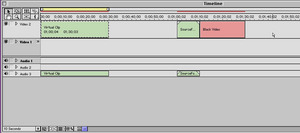
The plugin by itself may not extend a clip past its original duration. So let’s say we want to make sequence longer by a factor of 2. In order to make a clip longer, we first put the clip on the timeline OUTSIDE of the current working area. We extend the sequence by appending Black Video behind it on the timeline (see the Premiere manual) to the final duration needed. Then a Virtual Clip is made that has the required expanded duration, and refers to the original clip + Black Video. Make sure the original clip comes first in the Virtual Clip and the Black Video clip comes second (the Plugin won’t do what you expect if it’s the other way around). We then apply the Plugin to the Virtual Clip, using the appropriate settings that make it longer. That’s it. You can later move the Virtual Clip around the timeline as you need, BUT you may not move the clips (the original + Black) that the Virtual Clip points to (see the Premiere manual for explanation). Note: the Plugin actually changes the frames that are displayed. However, when you walk along the timeline in Premiere, frames are generally displayed pre-Plugin. To see the the Plugined version, you’ll need to Render Scrub (see the Premiere manual), or better yet, Preview the working area to RAM or disk (again, see your Premiere manual). For example, lets say we want to apply a RE:Vision Effects time-extending Plugin to a 10 second sequence, and that the final sequence will be 30 seconds. We put the source footage on the timeline OUTSIDE of the work area. We then put 20 seconds of Black beyond it on the timeline. We make a virtual clip, with duration of 30 seconds, that includes both the source footage + black video (see the Premiere manual for instructions). We then apply the Plugin virtual clip:
Premiere Figure 1. Set up a virtual clip that includes the source footage + black video with required total duration

(click to enlarge)

Premiere Figure 2. It is suggested that the source layer is set to “Current.”

(click to enlarge)

Premiere Figure 3. It is recommended that these two items be checked when using QuickTime editing.

(click to enlarge)

Hitfilm
Since plugins are not allowed to alter the duration of the source material in HitFilm, we can manually change the duration in the resulting composition setting in a pre-comp. The easiest way to do this is by taking the clip that we want to make longer and  make a pre-comp of our media by right mouse clicking, and selecting Composite from the pull-down menu. Here we can change the duration as I mentioned.  If we know the exact duration that we want our new composition or resulting clip to be, we can enter that number now. If you would like to watch tutorials on our plugins in HitFilm, here is the link: http://help.revisionfx.com/search/?h=85&%2Fsearch%2F= We are going to just choose an arbitrary number that we know will be longer than our new duration for now.  We can change that later.  I will make it 10:00. Now, we can make another composite with this pre-comp and we can add Twixtor to our pre-comp (or any other plugin that lengthens the clip).
Nucoda
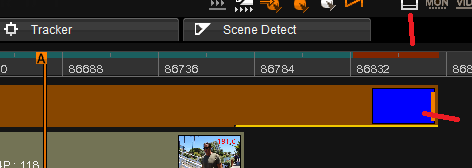
Instructions to make a sequence longer in Nucoda: First Activate Trimming ActivateTrimming Then Select Trim Mode You can now grab the clip handle. Notice the red line – the material is still off-line You need to select Properties and change the Duration, Apply and now a software like Twixtor can render frames past the original source duration. See your manual for more info